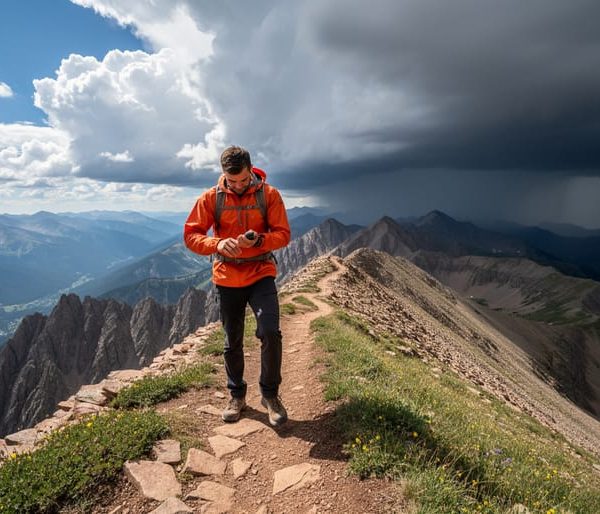
Check mountain weather forecasts every morning and evening during trip planning, focusing specifically on afternoon thunderstorm predictions, temperature swings of 30-40 degrees between dawn and midday, and wind speeds above 20 mph that signal dangerous conditions in Dillon’s high-altitude environment. Download offline weather apps before leaving cell service and memorize the basic cloud formations that precede storms—towering cumulus clouds by late morning mean you should be off exposed ridges by noon.
Learn to read pressure changes using a simple altimeter watch or barometer, since dropping pressure indicates approaching weather systems that bring precipitation and wind. At 9,000 feet elevation around Dillon, weather moves faster and hits harder than lowland environments, turning a pleasant morning into a hypothermic emergency within two hours.
Master the 30-30 lightning rule: when you see lightning, count seconds until thunder; if it’s 30 seconds or less, seek shelter immediately and wait 30 minutes after the last thunder before resuming activities. Understand that mountain weather operates on predictable daily patterns—clear mornings, cloud buildup by 11 AM, thunderstorms between 2-4 PM, clearing by evening—allowing you to schedule summit attempts and exposed travel during safe windows.
Recognize that weather literacy isn’t about memorizing meteorological terms but developing pattern recognition that keeps you alive. The Colorado mountains punish ignorance with frostbite, lightning strikes, and flash floods, but reward preparedness with safe, unforgettable adventures. This guide translates complex atmospheric science into survival-focused decisions you’ll use on every Dillon-area trail.
Understanding Mountain Weather Patterns Around Dillon
Why Elevation Changes Everything
Here’s a reality check that surprises many first-time mountain campers: for every 1,000 feet you climb around Dillon, the temperature drops by about 3-5 degrees Fahrenheit. If you’re camping near town at 9,000 feet where it’s a comfortable 70 degrees, that ridgeline campsite at 11,000 feet could be hitting 64 degrees or cooler by evening. This isn’t just about packing an extra fleece, it changes everything from how quickly hypothermia can set in to when morning frost hits your tent.
The oxygen story matters too. At Dillon’s elevation, you’re already working with about 25% less oxygen than sea level. Push higher on those backcountry trails, and your body needs more time to adjust. Plan shorter first-day hikes and give yourself an extra day to acclimate before tackling ambitious routes.
When scouting campsites, remember that cold air sinks. That picturesque valley bottom near the stream might be 10-15 degrees colder at sunrise than a site just 50 feet upslope. I’ve learned this lesson the hard way, waking to ice-covered gear while friends camped slightly higher stayed dry. Choose your elevation strategically, balancing accessibility, temperature comfort, and your group’s fitness level.
Microclimate Zones You Need to Know
Understanding microclimates can mean the difference between a comfortable night and a shivering ordeal around Dillon. These localized weather patterns vary dramatically based on terrain features, even within short distances.
Valley bottoms act as cold air sinks. As temperatures drop overnight, dense cold air flows downhill and pools in low-lying areas, creating frost pockets that can be 15-20 degrees colder than locations just a hundred feet higher. I’ve camped near streams in valleys and woken to frozen gear while friends on nearby ridges stayed comfortable. This cold pooling intensifies on clear, calm nights when there’s nothing to mix the air layers.
Ridgelines present the opposite challenge. While they escape the coldest overnight temperatures, they’re exposed to wind and storms approaching from any direction. You’ll gain warmth but sacrifice shelter. The sweet spot is often mid-slope locations that avoid both the valley’s cold sink and the ridge’s wind exposure.
Sun exposure creates another critical microclimate factor. South-facing slopes receive direct sunlight and warm faster, melting snow earlier and drying out quickly after storms. North-facing slopes stay shaded, cold, and snow-covered longer into spring. When selecting campsites, consider which direction your tent faces and when you want morning sun to warm things up.
Look for natural windbreaks like boulder fields or dense tree stands that buffer wind without trapping cold air. Avoid camping directly under lone trees that attract lightning or in drainage channels that funnel wind and water during storms.
Reading Cloud Types Before Your Trip
Storm Clouds That Mean Cancel or Postpone
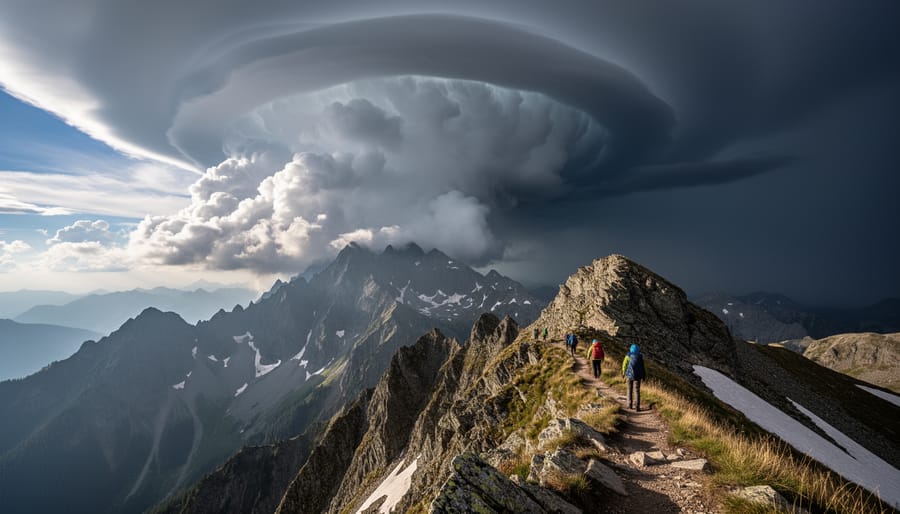
When you spot towering cumulonimbus clouds building on the horizon, it’s time to pack up and head for shelter. These thunderstorm giants can develop with frightening speed in Dillon’s high-altitude environment, going from puffy cumulus to full-blown electrical storms in under an hour. You’ll recognize them by their anvil-shaped tops that seem to scrape the sky and their dark, menacing bases that signal lightning, hail, and dangerous winds are brewing.
Equally concerning are darkening stratocumulus clouds that roll in like a gray blanket, especially when accompanied by dropping temperatures and increasing winds. These conditions often precede mountain squalls that can reduce visibility to near zero and drop temperatures 20 degrees in minutes. I’ve learned the hard way that when the base of any cloud formation appears greenish or yellowish-tinted, severe weather including hail is likely imminent.
Watch for rapidly moving clouds at different altitudes traveling in opposite directions, a sign of wind shear and instability. If you notice clouds forming below nearby peaks or see virga (rain evaporating before reaching the ground), conditions are deteriorating fast. The mountain rule is simple: when in doubt, bail out. Lightning strikes kill more people in Colorado than any other weather phenomenon, so respect those warning signs and reschedule your adventure for safer skies.
Safe Weather Windows: What Good Conditions Look Like
Learning to recognize stable weather patterns helps you confidently plan those perfect mountain getaways around Dillon. When conditions are favorable, nature sends clear signals that it’s time to hit the trails.
Fair-weather cumulus clouds are your friends in the backcountry. These puffy, cotton-ball clouds appear on sunny mornings and dot the sky without growing vertically throughout the day. They typically have flat bases and rounded tops, staying well-defined rather than merging into larger masses. If you see these gentle puffs maintaining their shape and spacing by midday, you’re looking at stable atmospheric conditions ideal for hiking or camping.
High cirrus clouds, those wispy, feathery formations at 20,000 feet or above, often indicate fair weather when they appear thin and scattered. Think of them as nature’s decorative brushstrokes across a blue canvas. These ice crystal clouds shouldn’t concern you unless they thicken and lower over several hours, which might signal an approaching front.
Watch for these additional stability indicators during your Dillon adventures. A steady barometer reading suggests continuing conditions. Morning dew on your tent means clear, calm nights. Light, variable winds rather than sustained strong gusts indicate settled weather. Clear visibility across the Tenmile Range lets you spot distant peaks with sharp definition.
The golden window for summer activities typically runs from mid-morning through early afternoon before thermal afternoon storms develop. Plan your summit attempts or exposed ridge walks during these stable hours. When you spot these favorable signs, it’s the perfect opportunity to explore local favorites like the Dillon Reservoir trail or venture into the surrounding wilderness with confidence.
Temperature Swings: What to Expect and How to Prepare
The 40-Degree Rule for Dillon Camping
Here’s a fundamental rule that’s saved countless camping trips around Dillon: expect temperatures to drop about 40 degrees from your afternoon high to the overnight low. This dramatic swing is more pronounced at our 9,000-foot elevation than at lower altitudes, and it catches unprepared campers off guard every season.
During summer months at campgrounds like Prospector and Peak One, you might enjoy a comfortable 75-degree afternoon, but that same evening will plummet to the mid-30s. I’ve watched families in shorts at 4 PM scrambling for jackets by 8 PM. Spring and fall are even more extreme. A pleasant 60-degree May afternoon can easily drop below freezing overnight, with frost coating your tent by dawn.
This temperature roller coaster happens because our thin mountain air holds less heat than dense air at sea level. Once the sun dips behind the peaks, warmth escapes rapidly into the atmosphere. Winter camping presents the reverse challenge: while daytime temps might reach a deceptive 40 degrees with brilliant sunshine melting snow off your tent, nighttime regularly drops below zero.
The practical takeaway? Always pack layers for temperatures 40 degrees colder than the forecast high. Your sleeping bag rating should account for the overnight low, not the pleasant afternoon temperature when you’re setting up camp.
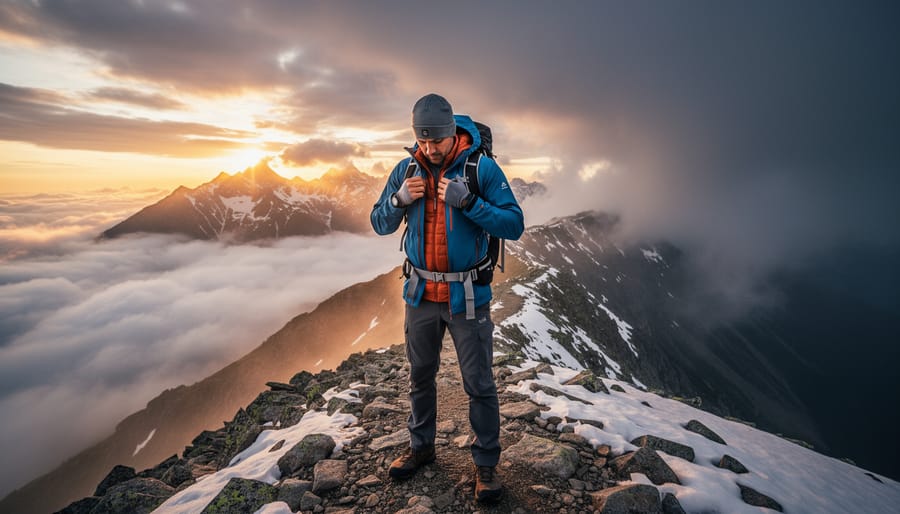
Layering Systems That Actually Work
In Dillon’s high-altitude environment where temperatures can swing 40 degrees between sunrise and sunset, mastering the three-layer system isn’t just comfort—it’s safety. Here’s what actually works on the trail.
Your base layer manages moisture against your skin. Choose synthetic fabrics or merino wool that wick sweat away, never cotton. During a July backpacking trip near Green Mountain Reservoir, I watched a fellow hiker shiver uncontrollably in a cotton t-shirt after a thunderstorm rolled through, even though it was summer. The moisture trapped against his skin dropped his core temperature fast. Quality base layers are part of your essential camping gear for any multi-day adventure.
Your insulation layer traps warm air. Fleece jackets and down or synthetic puffy jackets excel here. The beauty of this system is adjustability—add the fleece when clouds roll in at 10,000 feet, strip it off during uphill climbs. Pack both lightweight and heavier options for extended trips.
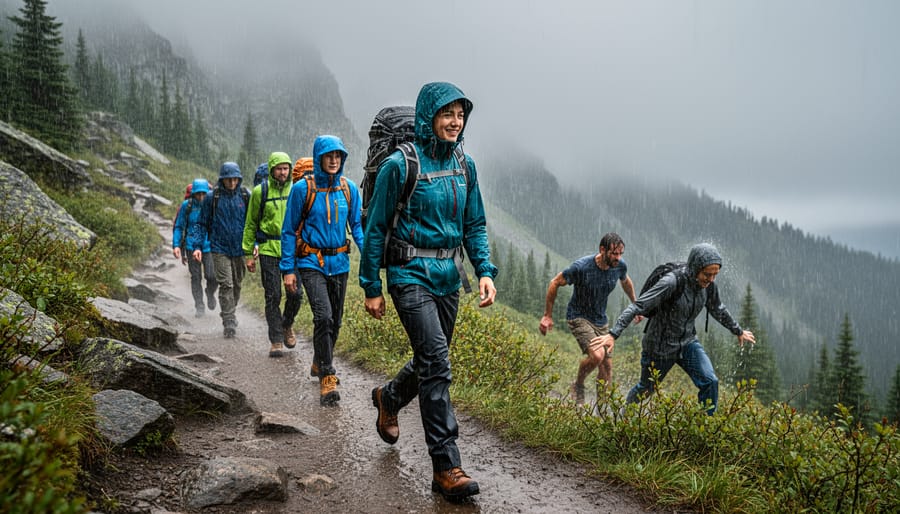
Your outer shell blocks wind and precipitation. A waterproof, breathable jacket with pit zips gives you ventilation control. Those afternoon thunderstorms common around Dillon demand reliable rain protection. Look for sealed seams and adjustable cuffs.
The real trick? Don’t wait until you’re cold to add layers. At elevation, your body burns extra calories maintaining temperature. Layer up during breaks before you start shivering, and shed layers before you overheat and soak your base layer with sweat.
Wind Patterns and What They Tell You
Morning Calm vs. Afternoon Gusts
In Colorado’s high country, your day unfolds on nature’s clock. Mornings around Dillon typically greet you with glass-like calm, especially during summer months. As the sun climbs over the peaks and warms the mountain slopes, air begins rising and creates thermal winds that build throughout the afternoon. By 2 or 3 PM, those gentle morning breezes have transformed into gusty winds that can make activities challenging and even dangerous.
This daily pattern makes timing crucial for your adventures. Plan paddleboarding, kayaking, or canoeing on Dillon Reservoir for early morning hours when the water’s surface mirrors the sky. Launch by 7 or 8 AM to enjoy stable conditions before the winds pick up. The same applies for ridge hiking along exposed Dillon Reservoir trails, where afternoon gusts can knock you off balance and make navigation treacherous.
Save afternoon hours for sheltered forest trails or activities near treeline where you’re protected from wind. If you’re tent camping, stake everything down securely before midday, and never leave loose items outside. Understanding this predictable rhythm helps you work with mountain weather rather than fighting against it, keeping your adventures both enjoyable and safe.
When Wind Becomes Dangerous
Wind becomes a serious safety concern when sustained speeds reach 20-25 mph, with gusts creating even more unpredictable conditions. At these velocities, tent stakes can pull loose from soft ground, rain flies whip violently, and even quality tents struggle to maintain their structure. Around Dillon’s high-altitude terrain, winds frequently accelerate through mountain passes and across the reservoir, amplifying their force.
When sustained winds exceed 30 mph, seriously consider postponing your trip or relocating to a more sheltered site. Look for natural windbreaks like dense tree stands or terrain features that block prevailing winds, but avoid positioning yourself directly under dead trees or loose branches that could become projectiles. Never set up on exposed ridgelines or peninsula points extending into Dillon Reservoir, where winds funnel with particular intensity.
Fire management becomes critical in windy conditions. Sparks can travel surprising distances, and what starts as a contained campfire quickly becomes a wildfire risk. If winds pick up unexpectedly, extinguish your fire completely, even if it means ending your evening early. In Summit County’s dry climate, one errant ember can ignite acres of forest within minutes, putting both your group and the broader community at risk.
Lightning and Afternoon Thunderstorms: Your Biggest Threat
The Afternoon Storm Clock
If you’ve spent any time hiking Colorado’s high country in summer, you’ve probably noticed a pattern: mornings start crisp and clear, but by mid-afternoon, dark clouds roll in seemingly out of nowhere. This isn’t coincidence—it’s atmospheric physics at work, and understanding it could save your adventure.
Summer storms predictably develop between 2-4 PM because the sun heats the ground all morning, creating rising columns of warm air. As this air climbs higher into the atmosphere, it cools, and the moisture it carries condenses into towering thunderheads. Around Dillon Reservoir and the surrounding peaks, this process is intensified by the terrain itself, which acts like a natural oven, focusing heat and triggering explosive cloud development.
Here’s your practical takeaway: plan summit attempts and exposed ridge walks to finish by noon, or 1 PM at the absolute latest. Start your hikes early—yes, that means leaving the trailhead at sunrise or even earlier for bigger objectives. If you’re planning lake activities or paddleboarding on Dillon Reservoir, schedule them for morning hours when conditions are calmest.
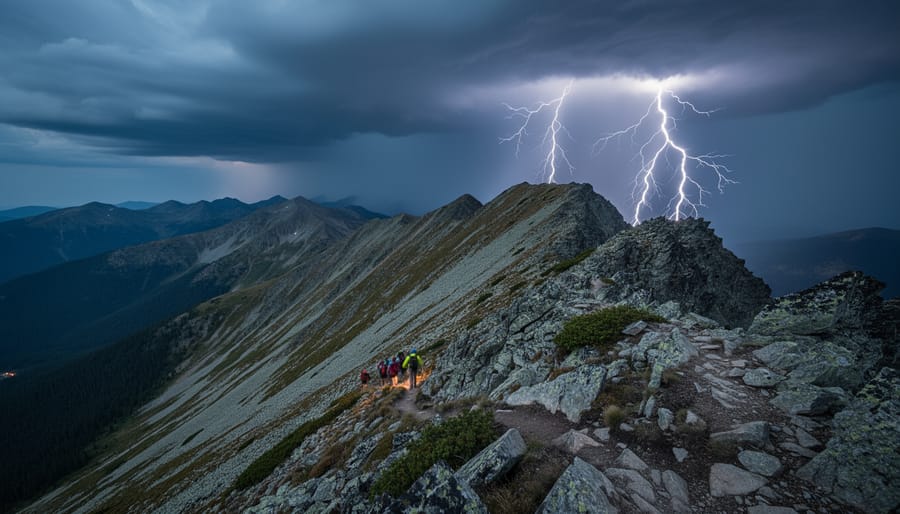
Watch for warning signs around midday: building cumulus clouds with vertical development, increasing winds, and dropping temperatures. If you hear thunder, you’re already in danger. Lightning can strike from clouds ten miles away, so don’t wait to see the storm directly overhead before retreating to lower, safer ground.
Where NOT to Be When Lightning Strikes
Lightning doesn’t care about your summit photo or your fishing spot. When storms roll into the Dillon area, knowing where NOT to be can literally save your life. Let’s talk about the danger zones and smarter alternatives when you’re caught out on the trail.
Ridge tops and mountain summits are lightning magnets. If you’re hiking peaks around Dillon like Buffalo Mountain or climbing toward the summit of any fourteener, turn back at the first rumble of thunder. Lightning travels through the ground after strikes, and exposed ridgelines offer zero protection. The rule here is simple: be off summits by noon during summer months when afternoon storms are most common.
That lone tree standing in a meadow might look inviting for shelter, but it’s actually one of the worst places to wait out a storm. Isolated trees attract lightning strikes, and you become part of the path to ground. Same goes for tall objects like flagpoles or exposed shelters at campgrounds. Instead, look for dense groves of smaller trees where you’re not the tallest object around.
Open water is equally dangerous. If you’re fishing at Dillon Reservoir or paddleboarding on Green Mountain Reservoir, get to shore immediately when storms approach. You’re the highest point on the water, making you an easy target.
Your best emergency shelter? A low-lying area away from isolated trees, ideally in a dense forest where trees are similar height. Crouch low with feet together, minimizing ground contact. Keep your survival essentials packed and ready to move quickly. Hard-topped vehicles with windows up provide excellent protection if you can reach them safely.
Precipitation: Rain, Snow, and Everything Between
Summer Rain vs. Snow Surprises
Don’t let summer fool you—around Dillon’s high-elevation terrain, snow can surprise you even in July and August. I’ve witnessed campers caught off-guard at 11,000 feet when afternoon clouds turned menacing and temperatures plummeted 30 degrees within an hour.
The warning signs are unmistakable once you know what to watch for. Dark, anvil-shaped clouds building rapidly over the peaks, sudden wind shifts, and that distinctive drop in temperature that makes you reach for a jacket are nature’s red flags. When you see graupel (small, soft hail pellets) bouncing off rocks, prepare for potential snow within the hour.
At elevations above 10,000 feet near Dillon, always pack insulation layers regardless of the season. I carry a lightweight puffy jacket and insulated pants from June through September—they’ve saved several trips from becoming survival situations. Even if morning temperatures hit 60 degrees, afternoon storms can bring near-freezing conditions and snow accumulation.
The practical rule: if you’re venturing above treeline or planning overnight trips in the high country, carry enough insulation to survive unexpected winter-like conditions. Your base layer, insulating mid-layer, and waterproof shell should always make the pack, no exceptions.
Staying Dry: Gear That Matters
Colorado’s afternoon thunderstorms can roll in fast, turning a sunny morning into a downpour within minutes. That’s why having the right waterproof gear essentials isn’t just about comfort—it’s about safety.
Start with a quality rain jacket featuring taped seams and a reliable hood. Look for pit zips to manage moisture from both rain and sweat during summer hikes. For your tent, choose one with a rainfly that extends close to the ground and offers at least 1500mm waterproof rating—Colorado’s intense sun can degrade tent fabric quickly, so check your gear before each season.
Don’t forget the little things that make a big difference. Pack extra trash bags to line your backpack compartments, keeping clothes and sleeping bags dry. Store matches and fire starters in waterproof containers. Apply seam sealer to your tent annually, especially if you camp frequently near Dillon Reservoir where moisture levels stay higher.
Keep a microfiber towel handy—it dries faster than cotton and takes up minimal space. Remember, staying dry means staying warm, and in the Rockies, that can be the difference between an uncomfortable night and a dangerous situation.
Using Weather Forecasts Effectively for Trip Planning
Which Forecast Tools Actually Work in the Mountains
Mountain weather changes fast, so you need forecasting tools built for high-altitude conditions, not just generic phone apps. Here’s what actually works when planning adventures around Dillon.
Start with NOAA’s point forecasts at weather.gov. Enter Dillon’s exact coordinates (39.6303°N, 106.0414°W) for hyperlocal predictions. These government forecasts include hourly breakdowns, wind speeds at different elevations, and crucial information about freezing levels that matter when you’re heading above treeline.
Mountain-Forecast.com has become my go-to for summit conditions. It provides three elevation bands (base, mid, and summit) showing how weather differs as you climb. The site covers major peaks near Dillon including Buffalo Mountain and the Tenmile Range, giving you wind chill calculations and precipitation types at various altitudes.
For real-time conditions, check Colorado Avalanche Information Center’s weather stations. Even if you’re not backcountry skiing, their mountaintop sensors provide accurate current readings that beat valley forecasts every time.
Local insight matters too. Stop by Dillon’s outdoor shops where staff monitor multiple forecast sources and know how weather patterns typically play out in specific drainages. They’ll tell you when a forecast looks sketchy for your planned route.
Cross-reference at least two sources before committing to exposed terrain, and always check the night before plus morning-of your adventure.
Building Your Weather Plan B
The smartest adventurers always pack a Plan B. When mountain weather turns unpredictable around Dillon, having backup options keeps your trip enjoyable instead of dangerous.
Start by identifying alternative locations at lower elevations before you leave home. If storms threaten your high-altitude campsite, locations like Old Dillon Reservoir Trailhead offer more protected environments. Keep a mental list of three potential camping spots with varying exposure levels.
Build flexibility into your daily schedule. Plan your most exposed activities like ridge hikes for morning hours when afternoon thunderstorms are less likely. Always identify the nearest shelter or safe retreat point before venturing into open terrain.
Know your decision triggers. If lightning appears within six miles, wind gusts exceed 30 mph, or visibility drops below 50 feet, it’s time to move to your backup plan or head home. There’s no shame in cutting a trip short. Experienced outdoor enthusiasts understand that retreating today means you’ll be around for tomorrow’s adventure.
Keep emergency contact numbers saved in your phone and inform someone of both your primary and backup locations. Weather-related decisions become easier when you’ve already done the mental preparation and eliminated the pressure to tough it out.
Putting It All Together: Your Pre-Trip Weather Checklist
Now that you understand the fundamentals of mountain weather, let’s transform that knowledge into a practical routine you can use before every Dillon-area adventure. This checklist takes the guesswork out of weather preparation and helps you make confident go or no-go decisions.
Start your weather check 48 hours before departure. Visit the National Weather Service site and examine the extended forecast for Dillon specifically, paying special attention to afternoon thunderstorm predictions between June and August. Check wind speeds at higher elevations if you’re planning summit attempts on trails near Silverthorne or Breckenridge. Compare multiple sources including Mountain-Forecast.com for elevation-specific data.
Twenty-four hours out, revisit the forecast and watch for changes. Mountain weather is notoriously fickle, and systems can shift dramatically overnight. Look for red flags like rapidly dropping temperatures, increasing wind speeds above 25 mph, or precipitation percentages climbing above 40 percent during your planned activity window.
On departure morning, complete your gear verification. Layer your clothing system based on the forecasted high and low temperatures, remembering that conditions at 13,000 feet differ drastically from Dillon’s 9,000-foot elevation. Pack your emergency essentials regardless of the forecast: extra insulation layer, rain shell, emergency blanket, headlamp, first aid kit, and fire-starting materials.
Establish your turnaround times and weather triggers before leaving. Decide in advance what conditions mean automatic retreat: the first rumble of thunder, visibility dropping below 100 feet, or temperature falling faster than expected. Share your detailed itinerary with someone reliable, including your expected return time and emergency contacts.
This systematic approach transforms weather knowledge into actionable safety practices that protect you and your group.
Understanding weather basics isn’t just about becoming a meteorology expert—it’s about transforming your outdoor adventures from unpredictable gambles into confident, well-planned experiences. Every time you check the forecast before heading out, recognize changing cloud patterns on the trail, or adjust your plans based on afternoon storm predictions, you’re making decisions that keep you and your loved ones safer in the mountains around Dillon.
The knowledge you’ve gained here becomes more valuable with practice. Start applying these weather fundamentals on shorter day hikes close to town before tackling multi-day backcountry trips. Notice how those puffy cumulus clouds develop throughout the morning. Pay attention to temperature changes as you gain elevation. Track how accurate your weather predictions become as you learn to read the sky alongside your weather apps. Each outing builds your confidence and sharpens your weather intuition.
Dillon’s mountain environment offers incredible opportunities year-round, from summer paddleboarding on the reservoir to winter snowshoeing through pristine forests. With solid weather knowledge backing your decisions, you’ll find yourself saying yes to more adventures rather than staying home out of uncertainty. You’ll know when conditions are genuinely dangerous versus simply challenging, and you’ll develop the judgment to turn back when necessary without second-guessing yourself.
The mountains will always demand respect, but they shouldn’t inspire fear. Armed with these weather basics, you’re ready to explore everything this remarkable area offers while keeping safety at the forefront of every adventure.